 |
|||
|
|
|||
|
Page Title:
PROCEDURE FOR MEASURING CAMSHAFT LOBES |
|
||
| ||||||||||
|
|
 CYLINDER HEAD AND VALVES
TESTING AND ADJUSTING
6. Turn the crankshaft 180CLOCKWISE (as seen from
a.
c.
Push rods that are bent.
front of engine). The TDC-1 mark on the damper
d.
Loose adjustment screw for the valve lash.
assembly will be in alignment with the timing pointer.
Make adjustment to the valves for No.4 and No.5
e.
Broken socket on the upper end of a push rod.
cylinders.
If the camshaft and cam followers show signs of rapid
7. Turn the crankshaft 180CLOCKWISE (as seen from
wear, look for fuel in the lubrication oil or dirty lubrication
front of engine). The VS mark on damper assembly
oil as a possible cause when making the necessary
will be in alignment with the timing pointer. Make
repairs.
adjustment to the valves for No.6 and No.8 cylinders.
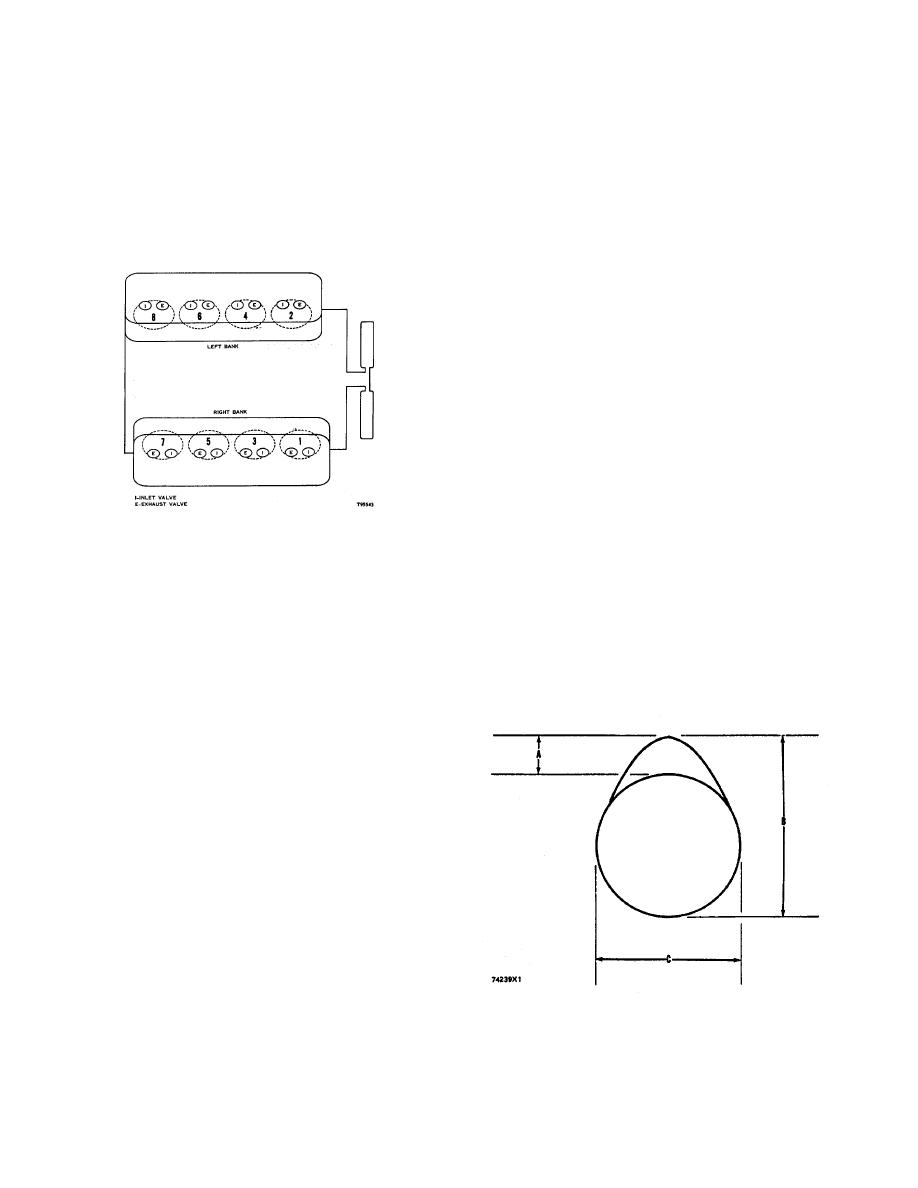
PROCEDURE FOR MEASURING CAMSHAFT LOBES
To measure height (B) of camshaft lobes, use the
following procedures:
1. Measure base circle (C) of one exhaust and one
intake lobe. Make a record of each dimension.
2. Add lobe lift dimension (A) to each base circle
measurement. The lobe lift dimension (A) is .3071 in.
(7.800 mm) for the exhaust lobe and .3077 in. (7.816
mm) for the intake lobe.
3. The minimum height of lobe (B) is .025 in. (0.64 mm)
CYLINDER AND VALVE LOCATION
less than the dimension found in Step 2.
When the adjustment of the valve lash needs to be
Example of finding the height of a lobe:
done several times in a short period of time, it can be an
indication of wear in a different part of the engine. Find
Base circle (C)
1.8200 in. (46.228 mm)
the problem and make any necessary repairs to prevent
Add lobe lift (A)
.3077 in. ( 7.816 mm)
more damage to the engine.
Lobe height (B)
2.1277 in. (54.044 mm)
Maximum wear of lobe
.025 in. ( 0.64 mm)
Not enough valve lash, if not corrected, can be the
Minimum height of lobe
2.1027 in. (53.409 mm)
cause of rapid wear of the camshaft and cam followers.
Not enough valve lash can also be. an indication of the
seats for the valves being bad. Some reasons for the
seats for the valves becoming bad are fuel injection
nozzles with defects, restriction to the inlet air or dirty air
filters, wrong fuel setting, or using the engine on loads
that are too large for the engine.
Too much valve lash, if not corrected, can be the
cause for broken valve stems, push rods, or spring
retainers. A fast increase in valve lash can be an
indication of any of the following:
a. Camshaft and cam followers with wear.
b. Rocker arms with wear.
CAMSHAFT LOBE
A. Lobe lift. B. Lobe height. C. Base circle.
71
|
|
Privacy Statement - Press Release - Copyright Information. - Contact Us |