 |
|||
|
|
|||
|
|
|||
| ||||||||||
|
|
 TM 11-6665-245-34
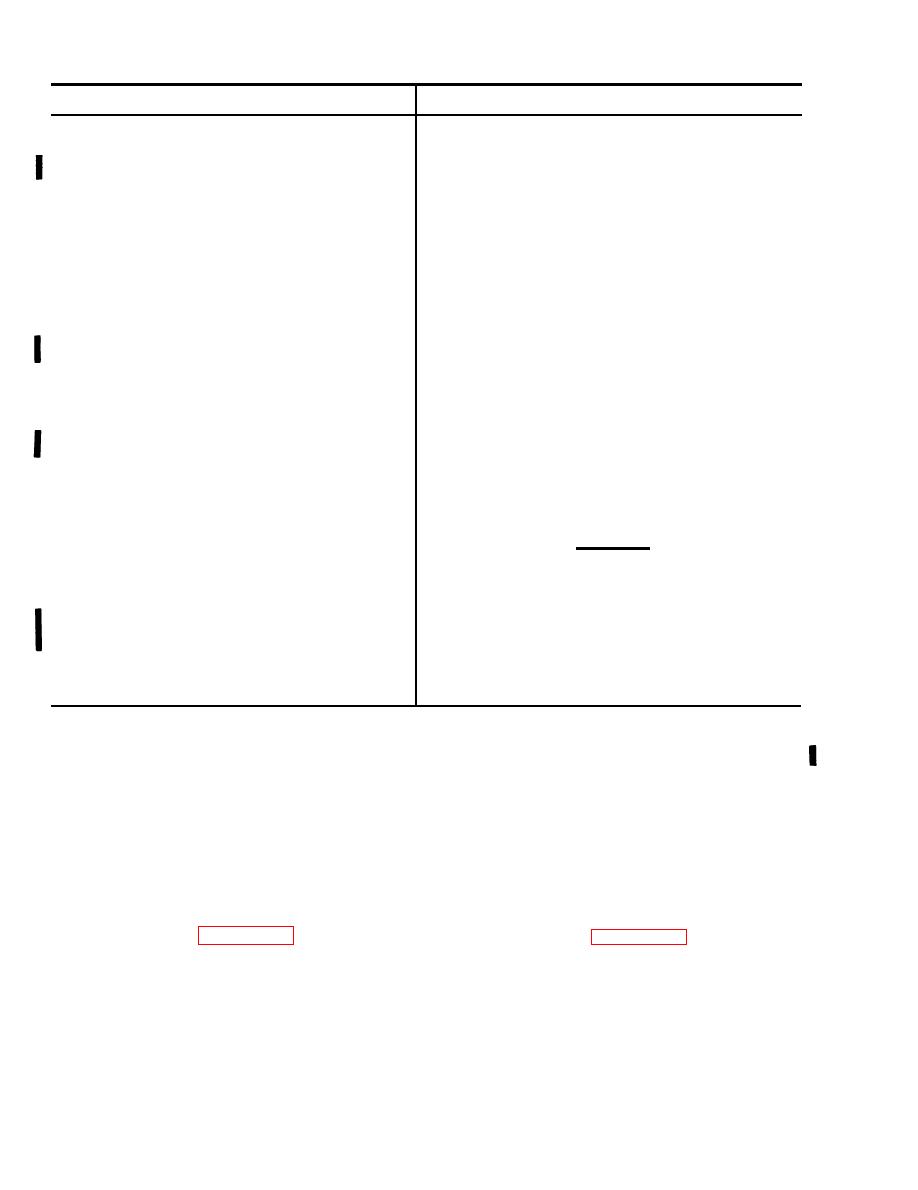
Table 3-2. Operational Test
Normal Results
Procedures
NOTE
Procedures 1 through 7 must be repeated for each
probe.
1.
Set selector switch in the following positions in sequence.
Meter scale (change window) shows OFF-BATT. Needle in-
a.
a.
BATT
dicates in the BATT area.
b. Meter scale shows red, 1 M scale. Needle is at zero after 1 or 2
b. 1M
seconds.
c. Meter scale shows orange, 100K scale. Needle is at zero.
c. 100K
d. Meter scale shows magenta, 10K scale. Needle is at zero.
d. 10K
e. Meter scale shows yellow, 1 K scale. Needle is at zero.
e. 1K
Meter needle pegs upscale.
2. Disconnect handles and place probe window on check
source.
Meter needle moves to zero when METER RESET switch is held
3. Set selector switch to 10K and press METER RESET
down; moves upscale when METER RESET switch is released.
pushbutton immediately on changing scales.
4. Connect headphones to panel connector and listen while
Clicking in headset can be heard to increase and decrease with
needle swing.
moving source back and forth on probe window to max-
imize needle indication.
Needle moves downscale to very low reading.
5. Remove headphones and then set selector switch to 100K
position.
Needle moves to zero or very low scale reading,
6. Switch to 1M position.
CAUTION
Be careful when allowing light to fall on bottom of
main probe. Do not allow meter needle to peg or
damage to the photomultiplier tube may result.
7. Allow light to hit probe window area while watching meter
Needle remains at zero.
needle. If needle goes upscale, immediately cover pro-
be window area, removing light. If needle does not go
upscale, increase light to window area.
Meter lights when switch is held down,
8. Press meter light switch on handle while watching for light
at top of meter scale.
first by installing two good batteries. Be careful to
assured that the equipment is working properly
keep probe window area shaded from light after
and can go for calibration. If an item or function
the equipment is turned on. If main or x-ray probe
fails the test, this will then develop symptom or a
light barrier is damaged, photomultiplier tube may
combination of symptoms to use in the
be destroyed from excess current. The auxiliary
troubleshooting table 3-3. To use the table, follow
probe is tested using a light source to find light
the directions in the procedures column to obtain
leaks rather than an electrical test as done with
the results in the normal results column. Start
the main probe.
REPAIR OF RADIACMETER
Section Il.
3-6. Removal and Replacement of Cover
3-7. Removal and Replacement of PCB
Assembly (Figure 3-4)
A s s e m b l y (Figure 3-4)
The cover assembly of the radiacmeter consists
a. Loosen six screws on the radiacmeter until
of the meter panel and all mounted hardware in-
the panel and case can be separated. The selector
cluding the printed circuit board and electronics
switch must be in the OFF position.
inside the case. In order to remove and replace
b. Remove connector J2 that connects the
the cover assembly, simply loosen the six screws
wiring harness to the PCB by grasping the con-
nector with the thumb and forefinger and pulling
which hold the panel and case together.
the connector.
Change 1
3-6
|
|
Privacy Statement - Press Release - Copyright Information. - Contact Us |
