 |
|||
|
|
|||
|
Page Title:
CONTROL PANEL ASSEMBLY. |
|
||
| ||||||||||
|
|
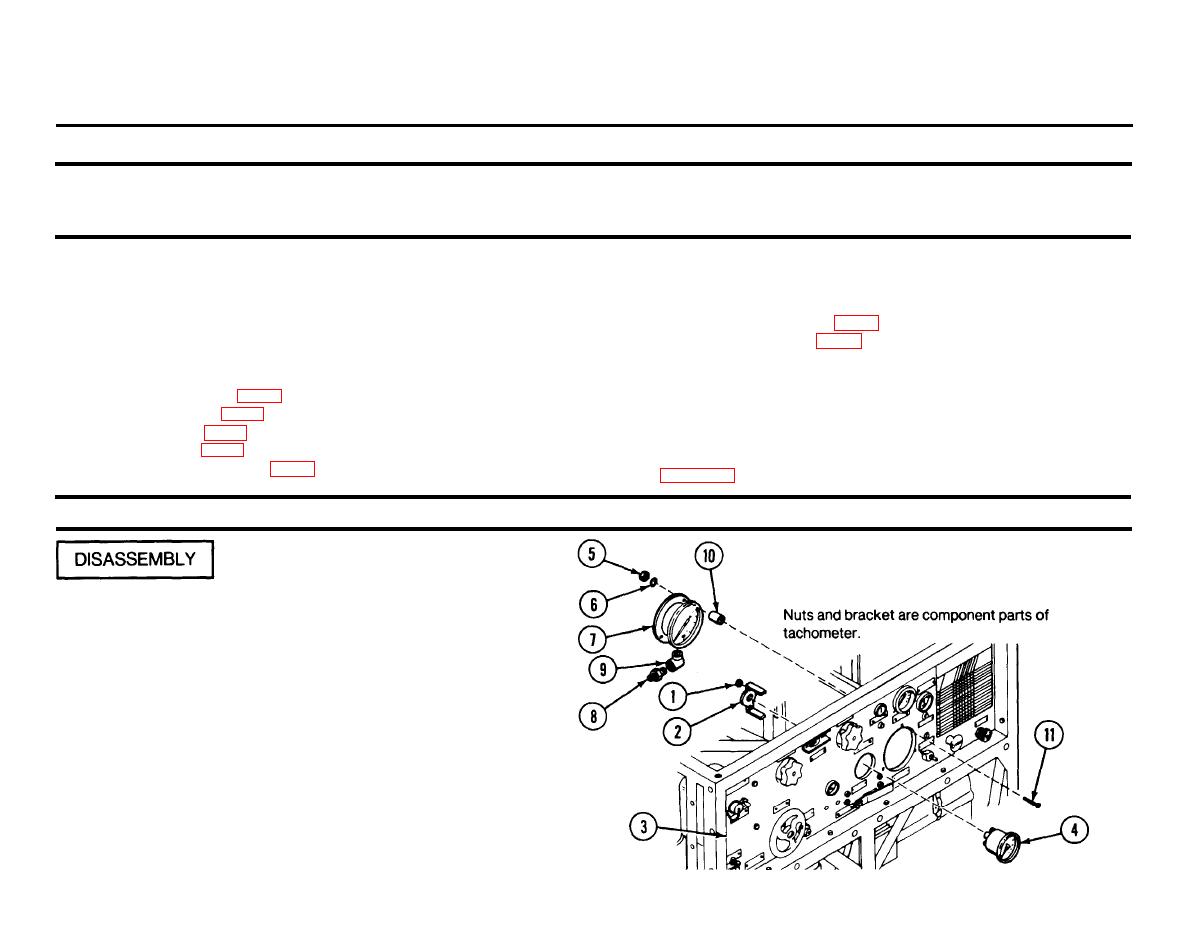 2-26. CONTROL PANEL ASSEMBLY.
This task covers:
c. Reassembly
a. Disassembly
b. Repair
INITIAL SETUP
Tools and Special Tools
Polyurethane coating (item 28, app D)
Automotive Maintenance and Repair Shop Equipment, Less Power
(SC 4910-95-CL-A72 and SC 4910-95-CL-A74)
Sealing compound (item 31, app D)
References
Materials/Parts
TM 43-0139
Antiseizing tape (item 35, app D)
Epoxy primer (item 29, app D)
Equipment Condition
Green tape (item 36, app D)
Assembled. Tachometer flex shaft assembly, vacuum gage hose, and
Paint brush (item 6, app D)
pressure gage hose disconnected.
Polyurethane coating (item 27, app D)
See para 2-12 to disconnect/reconnect procedures.
ACTION
REMARKS
LOCATION/lTEM
Control Panel Assembly/
Remove nuts (1) and bracket (2) from rear of
Nuts (1)
Bracket (2)
control panel (3), and slide tachometer (4)
Control panel (3)
out the front of control panel (3).
Tachometer (4)
Unscrew and remove self-locking nuts (5)
Self-locking nuts (5)
and flat washers (6).
Flat washers (6)
Remove pressure gage (7) with straight
Pressure gage (7)
adapter (8) and pipe elbow (9) attached.
Straight adapter (8)
Pipe elbow (9)
Remove sleeve spacers (10) from rear of
Sleeve spacers (10)
Machine screws (11)
control panel (3) and machine screws (11)
from front of control panel (3).
2-105
TM 3-4230-209-20&P
|
|
Privacy Statement - Press Release - Copyright Information. - Contact Us |
